

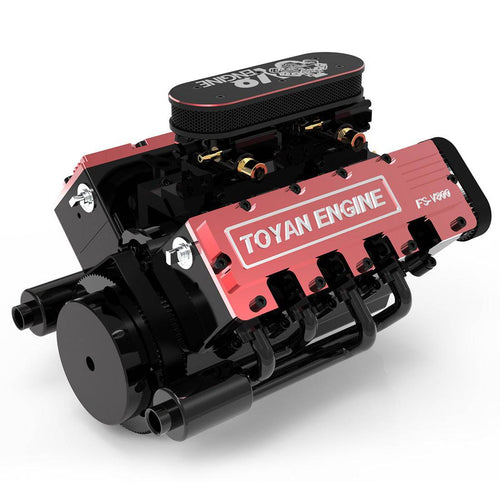
It's a very nice engine. I'm very pleased with the overall quality of the workmanship of this engine. There are just a few things that we should know when we're building this engine. Always try to build from the center out. It is a long block, so I mean it's very easy for things to bind up while you're building.
- Build from the center out to avoid binding
- Check for burrs and clean them up before forcing parts together
- Remove the nub in the center of valve spring covers to prevent wear on rocker arms
- Check and clean all machined surfaces and edges
- Install pistons in the order of 3, 4, 2, 5, 1, 6 to avoid binding
- Tighten and rotate each piston in order
- Drill oil return holes if necessary
- Check for any mistakes or oversights in the manufacturing process
- Appreciate the complexity and precision involved in making the engine
I'm pretty much going to build this exactly as you would build a Ford 300 engine. It's basically the same engine, so why wouldn't you want to build it like that? Very cool.
There are a couple of things that I've done on this. I'm also going to be doing that too just before I get into what I've done here. I'm also going to be doing that on the bottom side, working through the center and working your way out, and tightening everything from the inside out. Do that with everything. If you do it that way you will have less chance of warping parts and you know it's just the proper way of doing it.
If you have something that doesn't fit on nicely before taking that tool and banging or heating or something, take a close look. If you get a magnifying glass out if you need to, but maybe it's just a little burr as in the case with this tiny little gear here.
There's just a tiny little burr right on the ID there, and it's a little bit hard to see, but by taking an 82-degree bevel tool in there, I was able to just easily, 10-second boom, cleaned it right out.
I've also done and polished all of my valve spring covers, and this is what your rocker's arms actually push down on to open up the valve springs. Now, in the machining process, there's actually a little nub in the center of these from when the machine or mill it down. What you want to do is you want to get rid of that nub. That little nub will actually go onto you when this guy is pushing down.
It'll actually cut right into there and on the toy and well. When I didn't take that down in the first place, I noticed after like a couple of hours of running, I already had a nice little notch cut into my rocker's arm.
Also, just to make sure, there's a note that when you're going through this engine, you check and deeper everything. Go over every single machined surface edge, and feel it with your fingers.
What I've done on this is I've gone through and I've already cleaned up all the spark plug threads. I've gone and cleaned up everything, deburred every single hole, and as you can see there's a nice little bevel on everything.
When you're installing the pistons, you want to start from number three, then do number four, go to number two, then number five, number one, and number six.
If you follow that order, you will have less chance of binding, and hopefully, everything goes together smoothly for you. This block here does have the oil return holes in there, which is good.
I have decided to follow my gut and take a different approach to assemble the lower end. As of now, I have yet to install the pistons, but that can wait until tomorrow. One aspect that I particularly like is the appearance of the 45° spark plug boots in comparison to the generic ones. Additionally, I have swapped out the distributor timing adjustment screws for button head screws - specifically, one 2.5 x 8 screw and one 2.5 x 6 screw. In terms of the oil return cover, I have replaced the previous screws with six 3 x 10 button head screws. For anyone who is interested, I have documented the build process and would be happy to share it. Thank you for reading!
The engine was missing part #15, a pin to hold crankshaft pully so you will actually see me make a part in this video.
I did find my first missing part that I had to make.
3,5,1,4,2,6
everything does rotate smoothly piston cylinder 4 and 6 gave me difficulty.
I use a light to clearly see that all marks are facing the front of the engine.
When the pistons are being installed follow these steps.
Step 1: Make sure that you tighten the connecting rod capscrews tight.
Step 2: Back capscrews off 1/4 turn.
Step 3: Rotate crankshaft atleast 1 full rotation.
Step 4: Finish tighten connecting rod capscrews tight.
Step 5: Check that connecting rod assembly moves side to side easy and smooth, if not, return to Step 1.
set screw for water outlet was about .025 too long.. Basically not flush with the block so the hose nipple gasket will never have a water tight seal so by trimming the reducing set screw with a nut on the setscrew trim the excess with a dremal then back the nut off setscrew so threads are not damaged and set screw will easily screw in to block.
Please enjoy and have a great day!


Sad to hear that people are having problems with no answer for 5 months? Maybe I’ll look somewhere else for my engine
After looking around at the various types of engines I believe it’ll be the Ford 6 cylinder that I will be building very shortly as I grew up around this engine in the trucks that we drove on the road. I was wondering if everything comes included From Radiator technician to everything needed to get it up and running minus the platform thank you for reading my post
This engine comes with terrible instructions. Stirling kit is not answering my emails. They mentioned updated instructions will be ready “soon”, but that was over 6 months ago.
Very disappointed with their customer serivce.
Every model they sell has tons of issues, at least at first.