

Is it possible that a miniature 4 stroke nitromethane fueled OHC engine kit can cost $149.99 and actually be an engine kit that both beginners as well as experienced enthusiasts, can be impressed with? $150 is equivalent to about 25 large cup of coffees. I don’t like coffee, so for me it was a no-brainer.
I have never owned a Toyan miniature engine, so I consider myself a complete noob when it comes to this realm of engines.
I received my SEMTO Motor / Toyan FS-L200AC-OT kit last week from Stirlingkit, and honestly went into it with a bias of “$150 isn’t gonna buy much”.
The Otto Motor FS-L200AC-OT kit’s packaging was presented in a cool layered layout. Each part of the kit has an individual cutout in black foam, which showed each part’s finish and detail.


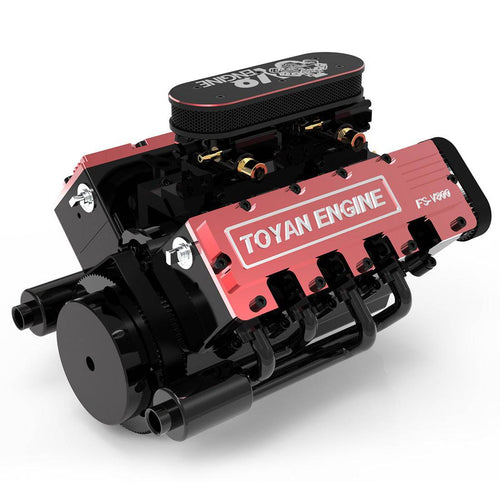
The crankcase is beautifully CNC machined aluminum, anodized black.

Other parts such as the cam synchronous pulley, idler, crank pulley and valve cover are anodized bright red, with the Otto Motor SOHC logo laser etched on the valve cover. Definitely nice looking parts, and I could tell the manufacturer was proud of their product.

Small parts were contained in a plastic compartment container, with numbers and pictures which correspond to the contents of each parts section.

Assembly manual is in a QR form, which allows any changes / updates to be posted in the instructions. I read through and looked over the assembly manual before beginning building the engine. Instructions are straightforward and easy to follow, in a step by step format. An assembled diagram drawing of engine parts is shown in the introduction, as well as a parts diagram with package locations.Clear illustrations and each part having a number makes it easy to locate each part used in the kit.
Crankshaft assembly is the 1st step, bearings and seals are installed followed by starter pulley & flywheel.
Next, piston rings are installed onto each piston, and using a provided piston ring compressor tool, are easily installed in the pre-installed cylinder sleeves. The tool prevents the iron piston rings from being misaligned, and possibly broken.

When installing the connecting rods to the crankshaft, each rod and rod cap are marked, because the con-rod bearings are each a matched assembly, which prevents seizing / friction due to a mis-matched rod bearing.

Next, the engine crankcase gaskets & bottom cover are installed.

Next, the camshaft support bearings, seals and synchronous cam drive pulley is put together and installed in the engine’s cylinder head. I found it helpful to use a bit of grease on each of the cam seals when inserting the camshaft into the cylinder head.
The cylinder head comes with the valves / springs / retainers pre-installed, so no special tool is needed, as well as no flying tiny valve springs or retainers… that will slow up the build.
The completed head and head gasket are installed onto the engine block, using 6 hex bolts.
The rocker arms are up next, and placed on the rocker arm support & secured using E clips.

4 valve spring buckets are installed on the valve springs followed by the rocker assemblies. Before installing the buckets, I greased the valve springs and camshaft before securing the rocker assemblies. Any high temp red grease works well for the valvetrain.
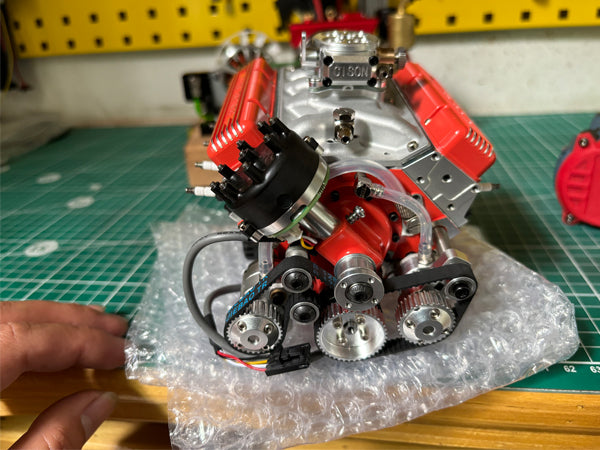
The engine has a unique intake manifold that feeds both cylinders from a single, dual needle carburetor.
The carburetor has a built in diaphragm type fuel pump - not something seen on many similar model engines. The pump keeps adequate fuel available to the carb through any RPM range. I was really impressed with the unique carb setup…

Needles & throttle lever are easy to access safely when the engine is running as well.
The engine timing belt, idler, pulley, and cooling fan with belt tensioner are installed to the block next.

Timing is easily set by a tick mark on the camshaft drive pulley, that corresponds to a mark on the crankshaft timing belt pulley. Super easy to put the engine in time, and check timing quickly by lining up the 2 pulleys. Timing belt tension is set by a sliding bracket under the cooling fan. Before installing the tensioning slider, I added a little grease as recommended by Dennis Dempsey.

The starter motor bracket, starter motor, and belt are next. Starter belt tension is adjusted by loosening the starter motor hex cap screws, and simply moving the motor.

Final steps included installing the exhaust header pipes / gaskets, the valve cover / gasket, and installing the included glow plugs.

The starting accessories set Stirlingkit offers is a fuel tank, silicone fuel tubing, and 2 glow plug driver / ignitor leads that have a resistor for stepping battery voltage down to 1.5v, with a deans type battery connections.
Really cool accessory, because other than having 2 hand held type glow plug ignitors, not many have a 1.5v battery rechargeable battery. Various R/C batteries can be used; I used two 7.4v lipo batteries for each glow plug.
I decided on using VP 20% Basher fuel for the FS-L200AC-OT.
I didn’t touch the factory carb needle settings, I only checked / adjusted the idle setting. The engine started and idled immediately.
Too freaking cool! I figured most likely I would’ve needed to adjust the carb based on my atmosphere / & fuel choice. I like the engine idle for a few minutes, leaving power to the glow plugs on, until the engine warmed up. The engines factory carb settings were a bit rich after the engine stopping as soon as I disconnected the glow plugs power. Leaning the carb 1/4 turn at a time, then testing ended up needing the main needle to be leaned out / turned clockwise until the engine ran smoothly without power to the glow plugs. Just carb setting was still rich fir break in; the engine ran cool, and when pinching the fuel line, it took around 3 seconds before rpm’s would increase, meaning the engine was still on the rich & safe break-in side.
Man this engine has a responsive rev!
Even at a rich carb setting, the no-load rev is quicker than I would have expected. Took it easy for the first few 75cc tanks of fuel, and after the 3rd tank, went to higher RPM speeds… the exhaust sound is killer; the little L2 has quite a bark to it. I swapped to a larger fuel tank (a 16 oz bottle) to run it in longer intervals…over and over. Played with it so much, I had to silence it using a couple silicone tubes for the exhaust directed into a bath towel to keep the neighbors happy at 10-11pm.
The SEMTO Motor continually ran great, average cylinder temps (no load) were around 120 degrees Fahrenheit, and within 5 degrees on each side, and responsive through the complete tank of fuel, which is awesome. 3/4 gallon of VP 20% later, I’m going to pull the valve cover and bottom crankcase cover check for wear & re-tighten & thread lock the internal’s bolts.


My first RC engine – SEMTO ST-NF2 is a four stroke Nitro fuel motor. I have been recommended to use KLOTZ BeNol Castor oil. I can pour it over the camshaft but how much to apply? no dipstick or site port. I need advice on how to keep the bottom end lubricated.