


How to Set Up and Start Your ENJOMOR GS-L6 Inline-Six Engine
For the GS-L6 28cc inline-six DOHC four-stroke water-cooled gasoline engine (assembled version), used with the water-cooling starter kit. Ages 16+. Younger builders should work under adult supervision.
1. Before You Begin
The GS-L6 ships fully assembled, but it is not ready to run out of the box. The engine itself does not include an igniter, ESC, fuel tank, fuel line, cooling components or gauges. You'll need to build up the supporting systems before it will fire.
What comes with the engine
- GS-L6 engine, assembled — 1
- Accessory pack — 1
- Manual (English) — 1
- Spark plugs — 6

What you'll need to buy separately
- Water-cooling starter kit — required. The engine will not run without it.
- Integrated base kit — optional. This guide covers the setup without the base; if you're not using one, you'll need to build a solid stand of your own.
- Turbocharger kit — optional upgrade.
- Two batteries — 12V and 24V. See section 3.
What's in the water-cooling starter kit
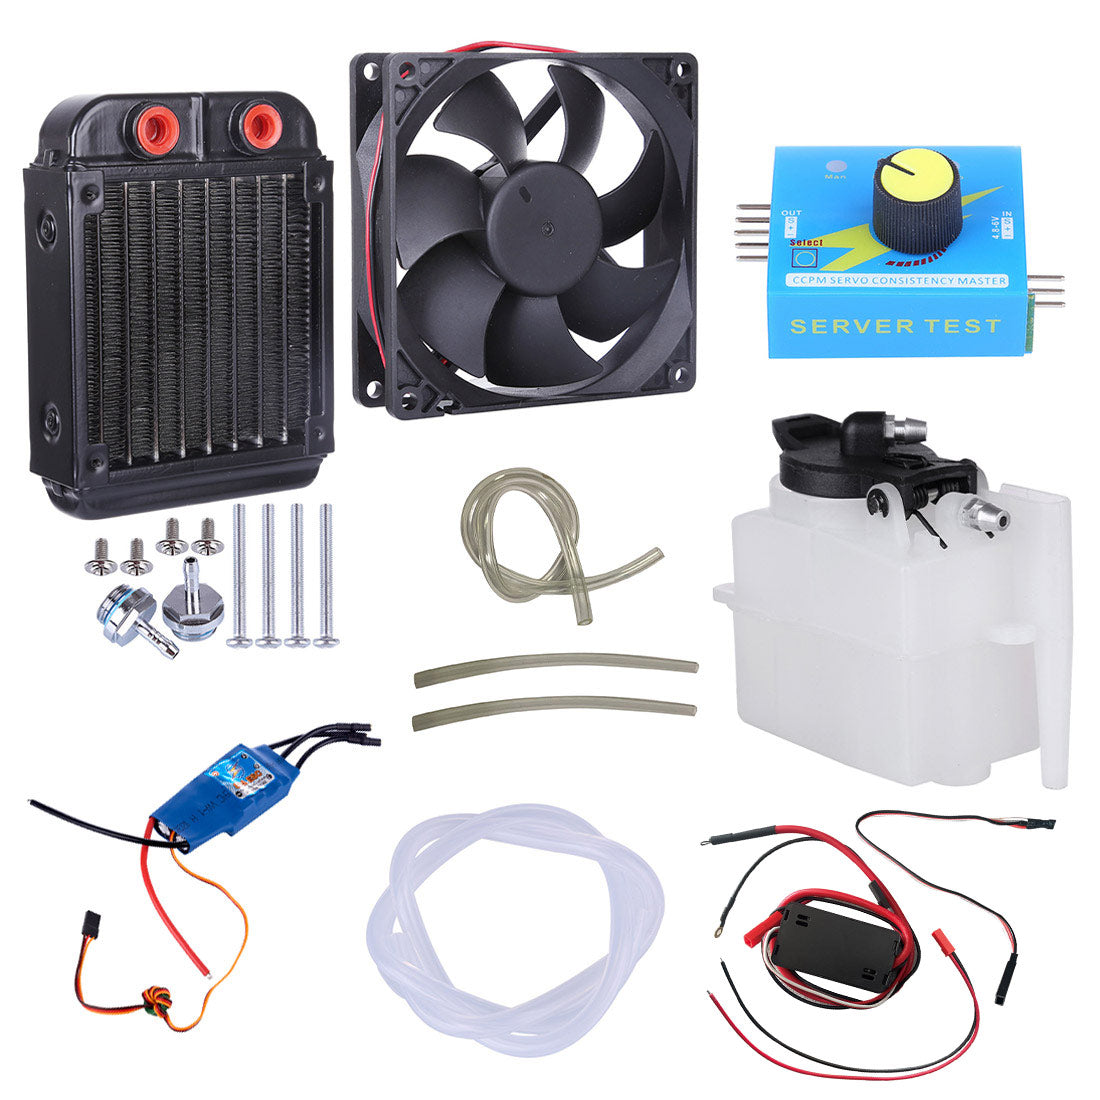
| Item | Specification |
|---|---|
| Dual-fan radiator — 1 | Metal, 16 × 8 × 6 cm, two-wire fan power lead |
| Coolant reservoir + hose set — 1Labeled "Water Tank" on the packaging | — |
| 80A brushless ESC — 1 | 7–24V input (12–24V recommended), max current >80A, soldered 3.5mm bullet connectors |
| Speed controller — 1Labeled "Servo Tester" on the packaging | 4.5–6.0V DC input, 1.5ms ±0.5ms output signal, manual knob |
| CDI igniter — 1 | 7–16V input, 15–20kV output |
| Spare Hall sensor — 1 | — |
| Fuel tank — 1 | 75 mL |
| Fuel line — 1 | Silicone, 3mm ID, 50 cm |
About the tank and reservoir: the ones in the kit are fine to use as they come. You're also free to swap in your own — the containers in our demo videos are a different type — as long as the capacity works, the fittings match and the material stands up to fuel and heat. If what you see in a video doesn't match the kit photo, nothing has been sent in error.
A note on filters: the kit doesn't include any. None of them are required to run the engine, but all three will meaningfully extend its life, and each is available separately.
- Fuel filter — the one we'd add first. It sits between the tank and the carburetor and catches debris before it can block the carburetor jets.
- Air filter — fits over the carburetor inlet to keep dust out. Worth knowing: once it's fitted, you can no longer cover the inlet with your thumb to choke the engine, so you'll need to pull it off before a cold start.
- Oil filter — keeps metal particles from the break-in period out of circulation.
Tools and supplies to have on hand
- Hex key set, Phillips screwdriver, spark plug socket (for the exhaust and the plugs)
- Syringe or oiler
- Automotive coolant (antifreeze) — red or green, either is fine. Do not use tap water.
- Clean 92/95/98 octane gasoline — no oil mixing required
- 4T four-stroke engine oil, 0W-20, 50 mL
- Fire extinguisher or fire blanket, safety glasses
2. Safety
This is a working internal combustion engine, not a display piece.
- Run it outdoors or in a well-ventilated space. The exhaust contains carbon monoxide.
- The exhaust and cylinder head get extremely hot. Give it at least 15 minutes after shutdown before touching either.
- Shut the engine down, disconnect power and let it cool completely before refueling.
- Keep hands, clothing and cables away from the flywheel and output shaft while it's running. At 10,000 rpm, any contact will cause serious injury.
- Always run the engine mounted to a base or stand. An unsecured engine will walk across the bench and can tip over.
- Keep a fire extinguisher within reach and wear safety glasses throughout.
3. System Overview and Power
The setup has four parts: ignition, starting, cooling and fuel. They don't share power supplies or plumbing, and if any one of them isn't set up properly, the engine won't run correctly.
Ignition and starting run on two completely separate batteries. Don't share them, and don't wire them in series.
| System | Voltage | Battery | Path |
|---|---|---|---|
| Ignition | 12V | 12V Li-ion pack (a 3S LiPo also works) | Battery → CDI igniter → distributor → spark plugs |
| Starting | 24V | 6S LiPo | Battery → start switch → 80A ESC → brushless starter motor |
| Control signal | 4.5–6V | Powered through the ESC signal lead | ESC → speed controller |
| Radiator fans | 12V | Can share the ignition battery | Both fans in parallel → 12V supply |
The speed controller runs on 4.5–6V only. Never connect it directly to the 24V battery.
It draws power through the ESC signal lead — plug the three-wire connector (signal / positive / negative) into the ESC's signal header as a set. Feeding it the wrong voltage will destroy it immediately.
Do not reverse the ESC polarity.
Reversing it destroys the ESC on the spot, and this isn't covered under warranty. Check once more before you connect the battery: red to positive, black to negative. There's no warning beep — just the smell.
4. Setup
The order matters. Get the electrics wired and confirmed working first, then add coolant, oil and fuel. Do it the other way around and you'll be troubleshooting wiring next to a machine that's already full of gasoline.
Fit the exhaust
The exhaust ships separately rather than pre-installed, so fitting it is the first thing to do after unboxing.
- Fit the O-ring first. It sits between the exhaust and the cylinder head and seals the joint. Check that it isn't twisted, damaged or missing before you go further.
- Line the exhaust up with the port and start all the screws by hand, then tighten them evenly — don't run one screw all the way down before the others.
A missing or pinched O-ring will let the joint leak, which shows up as an odd exhaust note and a drop in power. Once it's on, check that the joint sits flush all the way around.
Mount the engine
Bolt the engine to a base or a stand of your own and tighten all four mounting feet. It weighs about 3 kg and vibrates noticeably when running — one loose screw is enough to let the whole thing shift.
Wire the ignition
- Mount the Hall sensor. It isn't pre-installed — you mount and secure it near the flywheel, where it picks up the trigger for the ignition. If the position or gap is off, the timing will be wrong or it won't fire at all.
- Connect the CDI igniter's ignition lead to the distributor, which feeds the six spark plugs.
- Connect the CDI's red and black power leads to the 12V battery. The CDI accepts anything from 7 to 16V. On a 3S LiPo, that's 11.1V nominal, 12.6V fully charged and 9.0V at the bottom of the discharge range — all within spec, so a reading below 12V is normal discharge, not a faulty battery.
- Check that all six plugs are tight and that the HT leads are connected in the correct firing order.
The CDI puts out 15–20kV. Don't touch the HT leads or the metal part of a spark plug while it's powered.
Wire the starting system
- Connect the ESC's three motor leads to the brushless starter motor.
- Run the ESC's power leads through the start switch to the 24V battery.
- Plug the speed controller into the ESC signal lead. It takes its power from that lead — don't give it a battery of its own. The knob sets starter motor speed; start at the low end rather than winding it all the way up.
- Check polarity one last time before connecting the battery.
The switch controls main power; the speed controller sets the speed. Use them together: dial in a low starting speed first, then blip the switch.
Power up and check
This is the point of no return. Don't add oil, fuel or coolant until the electrics check out.
- Connect the ignition battery (12V). The CDI's indicator light should come on.
- Connect the starting battery (24V). The speed controller's indicator light should come on.
- If both are lit, ignition and starting power are both live and you can carry on.
CDI not lighting: check the 12V battery's charge, the polarity of the red and black leads, and the CDI-to-Hall-sensor connection.
Speed controller not lighting: check the 6S battery's charge, that the start switch is passing current, and that the signal lead is fully seated at both ends.
Once both check out, disconnect both batteries before you start filling anything. With power still connected, brushing the start switch while your hands are in there will spin the engine up.

Plumb the cooling system and fill it
The GS-L6 uses wet water cooling, with passages through both the block and the head. The water pump is built into the engine, so no external pump is needed for a standard setup. The circuit links three parts: engine, radiator and coolant reservoir.
- Run coolant hose between the engine, radiator and reservoir to form a closed loop, matching the inlet and outlet ports on the engine.
- Set the reservoir beside the engine. Keep both the reservoir and the fuel tank well clear of the exhaust — it runs far too hot for either of them.
- Secure every joint with a zip tie or hose clamp. A hose coming off will overheat the head within seconds.
- Wire the radiator fans. The two fans are wired in parallel — red to positive, black to negative, on a 12V supply. They can share the same 12V feed as the CDI, so there's no need for a third battery.
Have the fans running before you start the engine — don't wait until the temperature climbs. For which port is which, go by the markings on the parts themselves.

Use automotive coolant. Do not fill it with tap water.
Tap water will corrode the water passages and cylinder liners. That damage can't be undone, and the resulting deposits will block the passages and cause overheating. Any off-the-shelf automotive antifreeze will do — the common red or green types are both fine.
Filling: fill the reservoir to roughly two-thirds to leave room for expansion. Turn the crankshaft over by hand a few times to purge air from the passages, then top it back up. Route the hoses to avoid high points where air can collect, and don't let them kink.
If you're running without the radiator for now — just the reservoir and two hoses in a simple loop — the engine will still run, but cooling capacity drops sharply. Keep each run under 3–5 minutes and let the coolant come back down to ambient before the next one. That's fine for a quick test, not for regular running.
On external pumps: the built-in pump is driven by the engine, so circulation stops the moment you shut down and residual heat just soaks away on its own. Some builders add an external electric pump for better circulation and to keep coolant moving after shutdown. It isn't necessary, but it's worth considering if you plan on long, hard runs.
Fill the oil
The GS-L6 has its own oil pump, and lubrication is completely separate from the fuel. Fill through the oil port with 4T four-stroke oil, 0W-20, 50 mL.
Don't use two-stroke oil, and don't mix oil into the gasoline.
After filling, turn the crankshaft over by hand a few times to confirm the pump has picked up and the level has settled. Confirm the oil is in before the first run — running it dry will damage the cylinder walls and camshafts straight away.
What's already in there: every engine is test-run before it ships, so you may find a small amount of oil still inside when you open it up. That residue isn't enough to run on, and it doesn't count as having filled the oil. How much is left varies from engine to engine depending on how it was set up, so don't try to judge it by eye — just fill the normal amount.
Fit the fuel tank and line
- Mount the tank level with the carburetor or slightly below it so fuel can't siphon in on its own.
- Run the fuel line from the tank to the carburetor inlet. We'd fit a fuel filter in between — check that the arrow on the filter points the way the fuel flows, from tank to carburetor.
- Check every joint for leaks. Gasoline finding a hot exhaust is how fires start.
- Fill with clean 92/95/98 octane gasoline. Do not mix in oil — this is a four-stroke engine with its own oil pump.
The tank in the kit holds 75 mL, which limits how long you can run before topping up. Shut the engine down and let it cool before you refill. A larger tank is worth fitting if you want longer sessions.
There's no fuel shut-off valve in the standard setup, so fuel stays connected to the carburetor after shutdown. For longer storage, drain it — see section 7.
Throttle and carburetor
The throttle is set by hand — you turn the lever on the carburetor itself. There's no servo anywhere in this setup, and no radio gear is needed.
Before starting, set the throttle just above idle, around 1/8 open, then fine-tune it once the engine is running.

The carburetor inlet is what you cover with your thumb during a cold start. Two different actions are involved, and it's worth being clear on which is which:
| Action | Problem it solves | How |
|---|---|---|
| Priming | No fuel in the lines — gets fuel from the tank to the carburetor | Pump fuel through by hand to fill the dry line and charge the carburetor with its first fuel |
| Choking | Cylinder too dry to catch — pulls a rich charge from the carburetor into the cylinder | Cover the carburetor inlet with your thumb while turning the engine over, so the vacuum draws fuel in |
Which one you need:
- Dry lines (first start, or after a long spell unused): prime first to fill the line, then choke to start.
- Fuel still in the line: choking alone is enough — the vacuum will pull fuel through and fire it up without priming.
The part labeled "Servo Tester" in the kit is the speed controller. It only sets starter motor speed — it has nothing to do with the throttle, and you don't need a servo to go with it.
Pre-start checklist
- Exhaust fitted, O-ring seated, screws evenly tightened
- Engine bolted down securely
- CDI and speed controller indicator lights both come on when powered
- Cooling loop closed, filled and purged of air
- Oil filled
- Fuel in the tank, no leaks at any joint
- All six plugs fitted, HT leads in the correct firing order
- 12V on ignition, 24V on starting, kept separate
- ESC polarity correct
- Speed controller knob at the low end
- Radiator fan powered and turning
- Throttle just above idle
- Bench clear, extinguisher within reach
- Safety glasses on
5. First Start
- Switch the radiator fan on.
- Connect the ignition battery (12V).
- Prime. Take a look at the fuel line first: if it's dry, pump fuel through by hand to fill it and charge the carburetor; if there's already fuel in there, skip this step. Test-running at the factory may leave a little gasoline in the lines, but it varies from engine to engine — go by what you can see.
- Connect the starting battery (24V) and check the speed controller knob is at the low end.
- Choke. Cover the carburetor inlet with your thumb while blipping the start switch for 1–2 seconds, so the vacuum pulls a rich charge into the cylinder. Release as soon as it shows signs of catching.
- Blip the start switch in 2–3 second bursts — don't hold it down. If the starter is turning too slowly to spin the engine, bring the speed up slightly and try again.
- If it doesn't catch, wait 10 seconds between attempts. No more than five in a row, so the starter motor and battery can cool.
- Once it fires, release the switch immediately and use the throttle to settle it into idle.
When choking, keep your thumb on the carburetor inlet and nothing else.
Stay clear of the flywheel, output shaft and exhaust. Don't use this method on a hot engine.
Not catching the first time is normal. A new engine usually takes a few attempts — most often the fuel hasn't fully reached the carburetor yet, or the mixture needs a small adjustment. Resist the urge to hold the start switch down; all that does is overheat the starter motor.
6. Break-In
The first 30 minutes matter most.
- Keep it in the low-to-mid range, around 2,000–4,000 rpm. Don't rev it out.
- Run it in short sessions of 5–10 minutes, letting the engine and coolant cool completely in between.
- Keep an eye on reservoir temperature, whether the fan is turning, and the oil.
- Change the oil once break-in is done to flush out the metal particles it produced.
After that you can work the revs up gradually. The operating range is 1,500–10,000 rpm.
7. Shutdown and Maintenance
Every time you shut down
- Bring the throttle back to idle and let it run there for a minute or two to cool.
- Disconnect the ignition battery to stop the engine.
- Leave the radiator fan running for another 2–3 minutes to carry off residual heat, then switch it off.
- Disconnect the starting battery.
- Let it cool completely before putting it away.
Longer storage
- Disconnect the fuel line and drain the tank and carburetor, so no gum can form.
- Drain or replace the coolant — old coolant left standing will settle out and corrode.
- Store it somewhere dry.
Before every run
- Check oil and coolant levels
- Check every hose joint
- Check the mounting screws for looseness
Consumables
- Spark plug thread: 1/4-32 imperial (six supplied with the engine)
- Output shaft diameter: 10 mm
- Bore × stroke: 18.0 × 18.0 mm
8. Troubleshooting
The starter turns but the engine won't catch
- Check that fuel has reached the carburetor by looking at the line. If it's dry, prime first, then choke.
-
Over-choking will flood the engine — you'll see excess fuel at the inlet. Wipe it away with a paper towel; if necessary, remove a spark plug to clear liquid from the cylinder and turn the engine over a few times to expel it. Make sure the area is dry before trying again.

- Check the throttle is set just above idle.
- Check for spark (ground the plug body when testing).
- Check the CDI supply is within 7–16V.
Nothing happens when you press the start switch
- Check the start switch wiring and the 24V battery's charge.
- Check the speed controller is connected and its knob isn't at zero.
- Check ESC polarity.
- Consider whether the ESC has failed — one reversed connection is usually enough.
The starter turns too slowly to spin the engine
- Bring the speed up on the speed controller.
- Check the 24V battery is properly charged.
It fires, then dies immediately
- Throttle opening too small.
- Mixture too lean or too rich — adjust the carburetor in small increments.
- Air getting into the fuel line.
Coolant temperature climbing fast, or the reservoir is hot to the touch
- Shut down and let it cool.
- Check the radiator fan is turning.
- Check for air locks in the loop.
- Check the hoses aren't kinked.
- Confirm the loop isn't plumbed backwards.
Unusual vibration while running
- Shut down immediately.
- Check the mounting screws.
- Listen for a cylinder that isn't firing — the exhaust note will be uneven.
9. Getting Help
If you've worked through all of the above and it still won't start, email service@stirlingkit.com with:
- Your order number
- A video of what's happening, with sound
- Photos of your wiring
We'll help you track it down.
Engine and kits
- ENJOMOR GS-L6 28cc Inline-6 Engine
- Water-Cooling Starter Kit
- Integrated Base Kit
- GS-L6 Turbocharger Kit



0 Kommentare