
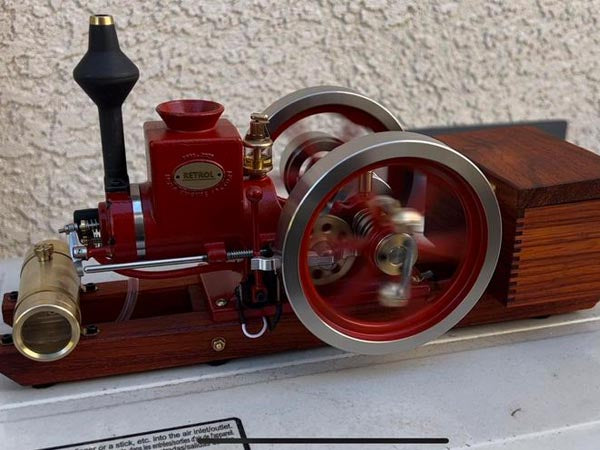
I have to admit, at first I was a little skeptical about this model. I had a few questions that I could not be answered at that time. Without reading any reviews or watching any videos, I placed an order for the Retrol RTR HM-01 hit and miss engine kits, fuel tank, skids and battery box.
About 10 days later, I was a little surprised to see the engine show up in the US. Everything was packaged very carefully, and I was quite pleased with the packing. To my surprise, the engine was carefully assembled and paid great attention to details. The fit and finish were first-class, and the machining quality was better than most of my models.

Being a collector of small gas and steam models, of which date back more than 100+ years, I’m quite familiar with the machining process and pay attention to the required details. I quickly assembled all the parts to get it in running order. I would say that I was a little disappointed that there were no paper instructions with the HM-01 engine model. I got the online manual. However due to my experience in handing the engine, I was able to assemble it quickly.
I did make some modifications to the skids and battery box, so that the wiring was concealed under the engine instead of next to the flywheel. Also, no instructions were ready at that time, so I had to figure out not only how to hook up the wiring, but also the best way to get the wiring into the battery box. I drilled a couple small holes in the bottom of the battery box to let the wires enter the battery box from the bottom/between the skids under the engine, so as to achieve no wire setting, without worrying about snagging a wire while starting or in the running process. I also connected the ground wire to the left rear screw and fastens it to the skid instead of the exhaust. I carefully cut and filed off the label to leave a cleaner appearance. Then I soldered on a 9v battery connection and added a toggle switch on the side of the battery box. At this time, it was ready to run. A little bit of 91 octane gasoline and trimming on the choke and needle valve, drop a few drops of oil everywhere, and it was off and running!

For most people, this would have been the end of their story, but for a tinkerer like me, this is the beginning of fun! I quickly noticed that it ran a little fast for the scale of the hit and miss engine model, even when the leaver had been moved to the “hit and miss” position. I messed up the mixture of fuel and air and the time, and I couldn’t slow it down. The HM-01 engine was hopping/sliding all over the place and there was oil everywhere. I just needed to slow it down to my liking. Had a little full-scale hit and miss and governor control engine experience, I knew that you could slow down the running speed by simply putting a lighter spring on the governor part. This particular engine has a spring on the beautifully made governor fly balls, so that was my first change.

I was quite surprised that although it did slow down the engine, it did not get the result I wanted. The engine ran much slower but it seemed to hit “fire” much too often for my liking. After investigation all the possible explanations, I found that the engine suffered a lot of unnecessary resistance due to excessive spring pressures. I dug into my automotive generator/starter brush rebuild kits to find a assortment of small low tension springs. After a day or so of fiddling around I solved the problem. I changed the spring on the intake valve with a very light spring, which felt enough tension to know that it was working. I lightened the weight of the exhaust halve, and now it is even lighter than the original intake spring. The exhaust shaft spring has also replaced by a shorter and much lighter tension spring. With the good running-in of the engine at this point and these modifications made, when turning the flywheel, the heaviest load imposed on the engine was now the point that was pushed open. It's running again. It ran much better, but it still did not appear as it should.

Upon further inspection, I noticed that there was a fair gap between the aluminum governor locking arms,which was missed by the brass locking block used to hold the exhaust rod and the valve open. This made the rocker arm swing back and forth unnecessarily when the engine was missing, which led to unnecessary resistance, due to the roller bearing made unnecessary contact each revolution. I had to figure out a remedy. Having all sorts of parts and materials laying around, because I have been in the hobby for more than 10 years, now I thought to solder or glue a small piece of copper on the locking arm,which was file fit to size. It is very suitable for the locking arm, but when I reinstalled the arm, I noticed that it was just a couple thousands too thick for it to do it’s job.

I removed and reinstalled the arm several times, and carefully filed the new brass shim until it was able to swing into place with very little clearance between it and the brass lock block was very small. I dropped a drop of oil on the copper shim to make it burn again. I immediately noticed the difference of the engine. this improvement made the speed of the engine more accurately controlled by the governor spring. The movement of the rocker arm was very small when it was in the open position. I could fine tune the speed by playing with different governor springs.

At this point I was pretty happy, but we still did have a decent sized problem. I noticed that the oil dripper didn't work. It was more or less an on or off oiler. For this engine cylinder to be properly oiled it needs a slow consistent flow of oil, no on and off source. In taking apart the oiler, I found that 2 pieces weren’t processed to the appropriate specifications. The lids threaded nipple needed to be shortened and the adjuster nut that twists on that lid for the adjustment also needed to be shortened.

In my assessment, I noticed that the needle valve did not contact the valve seat, when it was in the open position, regardless of the adjustment setting. All I did was take some 220 grit sandpaper, put it on a smooth top workbench, and slowly rub the two parts of sandpaper in a circular motion until I reached the desired length. A little trial and error, I just made sure not to remove too much material until I have the ideal length. Once reassembled and working, I continued to look for the best way to keep gear lubricated and quiet.
Much like a full-size engine, the gears may be a little noisy. I found that a very thick oil additives were the most effective for noise and longevity. In this case, the thicker the better. What you are looking for is something resembles tree sap on a warm day. I tried different fuels, from 91-110 octane and denatured alcohol. To my surprise, 91 octane was the best one, unlike some of my other engines. Great for simplicity, but unfortunately, in my opinion, it's more like an outdoor model, at least if it runs for prolonged periods of time, no matter how successful you are with other fuels.

Many times, this Retrol hit and miss engine models are a little bit choosy about what they like, and they run differently with the same fuels. All in all, this is undoubtedly one of my favorite models in my collection.

Stirlingkit has been a pleasure to speak with and even has sent me some courtesy surprise parts and paper manual later, in the mail, just because! If you are debating about buying this model engine like me,I can understand. However, after receiving the model, the appearance and its sound did leave everything satisfactory. I would encourage you to take the leap and make the purchase. If you like tinkering like me, or if you have a nice collection and want to add another nice engine, or if you even buy a model engine for the first time, you won't be disappointed with this scale engine model. I feel it has something that any first time buyer, amateur collector or experienced model collector will look for in the model engine.


Wow! You are a real mechanical engineer! you are really generous to share with us your upgrade Danna. You have a video before & after modifications? I think it will be my next birthday gift! Thanks!!